Lip enhancement has matured from a trend into a refined aesthetic treatment that can restore balance, definition, and hydration while respecting natural anatomy. Patients who arrive asking for lip augmentation rarely want a one-size-fits-all “plumping” anymore. Most want nuanced lip shaping treatment that preserves their character and fixes a few specific issues: thinness, asymmetry, lipstick bleed, or a flattened Cupid’s bow. A precise lip filler procedure can address these, but the best outcomes come from understanding how the process unfolds, what decisions drive product choice, and what recovery truly feels like in the days after lip injections.
I have treated lips in a wide spectrum of ages, skin types, and aesthetic goals. The common threads are careful assessment, conservative volume strategy, and a commitment to safety. Below is a practical, step-by-step walkthrough of a professional lip enhancement procedure, including the moments that matter before the syringe ever appears, and the small technical choices that shape the final result.
What good lip enhancement actually means
Good lip enhancement is measured less by sheer volume and more by balance. The upper lip to lower lip ratio typically looks natural in the range of 1:1.6, but individual anatomy and ethnic variation can shift what reads as harmonious. Most patients benefit from restoring shape: subtle definition of the white roll, gentle lift at the Cupid’s bow peaks, and calibrated support of the vermilion. Lip hydration filler can smooth vertical lip lines without making the upper lip project too far. Lip filler for symmetry can correct one side that collapses when smiling, while a lip border enhancement can prevent lipstick migration. The best lip filler results are the ones you do not immediately notice as “filler,” only as healthy, expressive lips that fit the face.
Filler options in plain language
While there are many lip filler brands, most high-quality lip injectable fillers used in the lips are hyaluronic acid based. HA lip filler integrates with tissue, hydrates, and can be reversed with hyaluronidase if needed, which supports safe lip filler practice. Within the HA category, gels vary by crosslinking and rheology. Softer gels (sometimes called soft lip filler) excel at lip hydration and subtle lip filler looks, while more cohesive gels provide structure for the Cupid’s bow or a mild lip lift filler effect without migration.
Juvederm lip filler and Restylane lip filler lines each include multiple textures. For example, some clinicians reach for a silkier gel to smooth vertical lip lines, then layer a slightly more supportive gel along the vermilion border for definition. The choice is guided by the lip’s baseline anatomy, dynamic movement, and the patient’s goals. A beginner lip filler plan, for someone new to treatment, typically favors a softer, more forgiving gel and smaller volumes. Advanced lip filler techniques may combine needles and cannulas, treat the lip body differently from the border, and adjust angles to manage projection versus width.
Long lasting lip filler often correlates with firmer gels and deeper placement, but longevity depends on metabolism, movement, product choice, and technique. In most cases, lip filler longevity ranges from six to twelve months. Some see faster softening due to high activity or a naturally brisk HA turnover. A discreet lip filler touch up at three to six months can keep results fresh without ever looking “done.”
Who is a good candidate
Candidates for non surgical lip augmentation include those seeking lip volumizing treatment, enhanced definition, or improved symmetry. I look for healthy tissue, good oral hygiene, and realistic expectations. Smokers can still have lip augmentation treatment, but we discuss the increased risk of bruising and the impact on healing and lip wrinkle formation. Active cold sores need treatment and rescheduling. Pregnancy is a no-go, and breastfeeding requires a cautious, individualized discussion. Anyone with a history of severe allergies or anaphylaxis deserves extra screening and a frank conversation about risks.
Some want an instant lip enhancement for an event. That is possible with modern lip filler techniques, but I guide them away from first-time lip augmentation within a week of a major occasion. Swelling and small bruises are common. Give yourself a buffer. For those with prior lip injections or concerns about old product, lip filler consultation should include palpation and sometimes ultrasound evaluation, especially if you have lumps, firm cords, or asymmetry. Lip filler correction or lip filler dissolving with hyaluronidase may be recommended before new filler is placed.
A realistic timeline, from consultation to results
A comprehensive lip filler consultation sets the stage. We start with a medical history: allergies, medications, prior cosmetic treatments, and any autoimmune conditions. I review your routine, including supplements like fish oil or ginkgo that can increase bruising risk, and I ask about events in the next two weeks. Then we photograph from several angles, including gentle smile and animated expressions. Lip filler before and after photos help document subtle changes that can be hard to perceive day to day.
I discuss lip filler types, expected lip filler results, and the trade-off between fullness and movement. A strong, vertical pout might look striking at rest but flatten when you speak if the filler is placed only in the central tubercles. We touch on lip filler myths too, such as the idea that dissolving always damages tissue, or that one brand is inherently superior for everyone. The truth is more nuanced. The best lip filler is the one that matches your anatomy and your goals, and the injector’s technique matters as lip filler Orlando FL much as the label on the box.
Most first-time treatments use 0.5 to 1.0 mL. I rarely exceed 1 mL in a single session for a natural looking lip filler outcome. Bigger transformations often work better as a staged lip filler refinement plan over two or three visits. It keeps swelling manageable and preserves fine control over shape.
Preparing for treatment day
If you can, pause blood-thinning supplements for a week with your physician’s approval. Arrive well hydrated and fed. Skip alcohol the night before. If you have a history of cold sores, ask about antiviral prophylaxis, especially for upper-lip focused procedures. Remove heavy makeup from the lower face. Bring a reference photo if you like, but remember that different lip shapes reflect different bone structure, tooth show, and philtral columns. Our goal is your best version, not someone else’s.
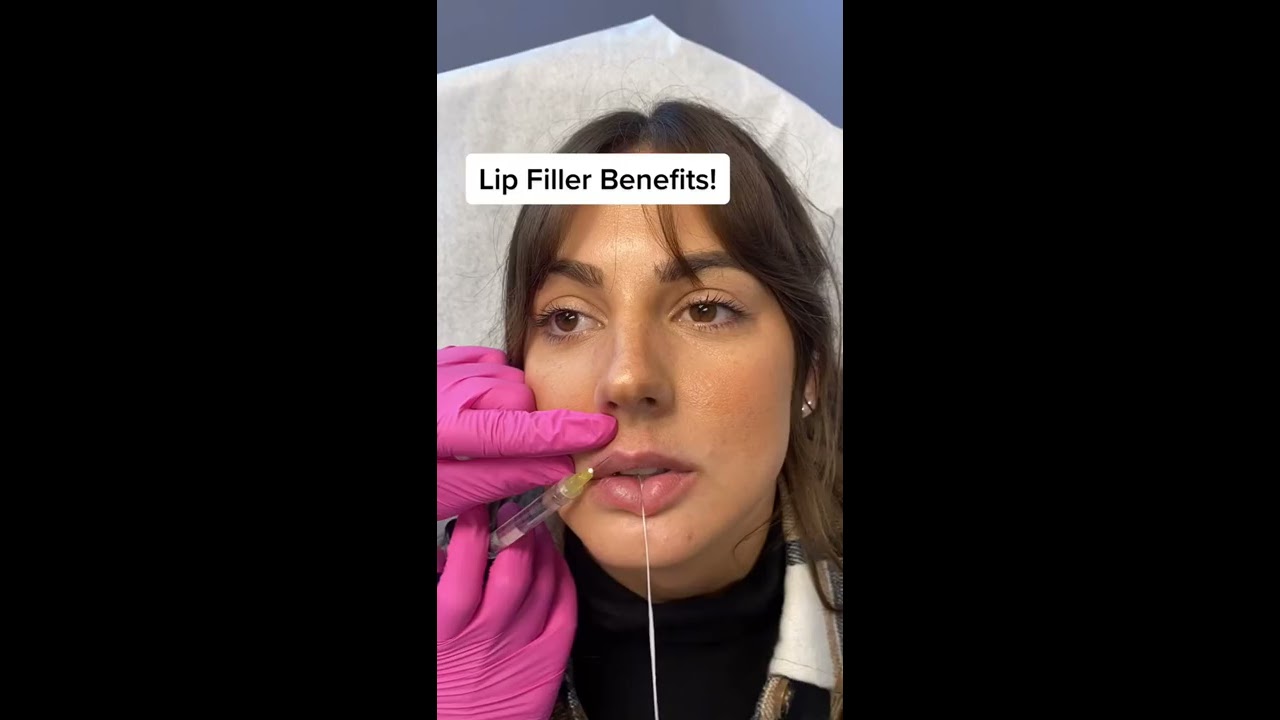
The step-by-step lip injection procedure
The lip injection procedure is meticulous, but it is not complicated when each step is handled with intention. The sequence below reflects my typical workflow for a safe lip filler procedure with HA lip filler. Small variations occur depending on the lip filler techniques selected and your unique needs.
- Cleanse and anesthetize: I disinfect the area and apply topical anesthetic for 10 to 20 minutes. Some products contain lidocaine, so comfort improves as we proceed. For anxious patients or those with sensitive lips, a dental block is an option. Mapping and micro-planning: I mark key landmarks: Cupid’s bow peaks, philtral bases, commissures, and any asymmetry lines. We decide which zones need lip body filler versus lip line filler. I confirm how much projection versus width you want, and whether a slight lip pout enhancement is desired. First passes for structure: I often start with subtle support along the vermilion border to sharpen definition and resist lipstick bleeding. This is light work, usually tiny aliquots. If your border is naturally crisp, I skip this step to avoid stiffness. Volume and shape in the lip body: For lip filler for volume, I place micro-boluses or linear threads within the lip body. Upper lip gets proportionally less than the lower lip, unless we are correcting a very thin upper lip. I watch how the lip moves when you speak to avoid overfilling the central columns. Final detailing and symmetry check: I refine corners, soften any “shelf” at the upper lip, and revisit the Cupid’s bow if the peaks flattened during swelling. Gentle massage helps integrate the gel. I avoid overworking the area to prevent unnecessary trauma.
I use either a needle or cannula depending on the task. A needle provides crisp control at the border and in the tubercles. A cannula reduces the risk of bruising for lip body filler and can glide under delicate tissue with fewer entry points. Precision lip filler requires both tools. I always aspirate thoughtfully and maintain slow, low-pressure injections, an important part of safe lip filler technique, although aspiration is not a guarantee against intravascular placement. Constant attention to tissue color, pain feedback, and resistance matters just as much.
What it feels like
The first few injections can sting, but most patients describe the discomfort as mild, about a 3 to 5 out of 10. The lip cools as the lidocaine in the gel takes effect. You will feel pressure and occasionally a scratch as the needle or cannula moves. The lower lip often tears up reflexively when the border is treated; it is a nerve response and passes quickly. A soft ice pack between steps helps.
Immediately after: mirror check and early swelling
Right after the lip filler treatment, we evaluate in the mirror with you upright. You will see swelling, especially at the injection points. This is where experience is helpful. If the upper lip looks slightly fuller than planned, I account for the fact that swelling peaks within 24 to 48 hours. I document the result from multiple angles and provide a simple lip filler aftercare plan. Most patients return to work or errands the same day. If you bruise easily, plan your schedule with that in mind.
Aftercare that makes a difference
I prefer clear, simple instructions so patients do not overthink recovery. Skip strenuous exercise the rest of the day. Keep the head elevated while sleeping the first night. Gentle icing for ten minutes on, ten minutes off, for a few cycles can help. Avoid heavy makeup on the lips for 24 hours. Do not massage unless instructed. Skip saunas and very hot showers for 48 hours. Hydrate well. Over-the-counter pain relief like acetaminophen is usually enough if needed.
If a bruise appears, it is usually at an entry point along the border or near the commissures. Arnica may help some patients. A touch of concealer after 24 hours is fine. Mild asymmetry can surface as swelling resolves in uneven patterns. That early wobble settles in a few days. I schedule a check at two weeks when the lip has relaxed and we can assess true results. This is the right time to discuss a lip filler touch up for any remaining tweaks.
Safety, side effects, and how we mitigate risk
Side effects are mostly transient: swelling for two to three days, tenderness that fades within 48 hours, occasional bruising that can last up to a week. Lumps are often swelling or small collections of gel and usually respond to brief, guided massage or simple time. For persistent nodules or migration, a reassessment is essential. Sometimes lip filler experts near me a minimal amount of hyaluronidase helps smooth a tricky area, followed by conservative reinjection once the tissue settles.
Serious complications are rare but real. Vascular compromise requires immediate recognition and action: stop injecting, assess capillary refill, institute warming and massage, and administer high-dose hyaluronidase across the affected territory promptly, then escalate care as needed. A skilled injector will have protocols, product on hand, and a calm, systematic response. This is one of the key reasons to choose an expert lip filler provider rather than a bargain setting where emergency readiness is uncertain.
How lips change over the first month
Lips are emotionally high-impact. People scrutinize them closely. For the first 48 hours they look swollen and sometimes a bit uneven. By day three or four, the shape becomes closer to the plan, though a faint firmness may linger. Most patients feel “photo ready” around day five to seven, sometimes sooner if bruising is minimal. Subtle integration continues for two to four weeks as the gel binds water and the tissues settle. That is why the two-week review is my baseline for final evaluation, with optional minor refinements any time after that point.
Technique nuances that shape outcomes
Small choices add up. For a patient with thin tissue and a short philtrum, heavy filler along the central upper lip can tip the balance, creating a top-heavy look. Instead, I support the lateral upper lip for width and leave the central portion lightly filled to maintain a delicate Cupid’s bow. For those with lipstick bleed, I treat the cutaneous lip-labial border with minimal, high-precision threading to restore the white roll, then add a hydrating gel in the superficial plane to soften vertical lines. If the lower lip lacks curve, a few micro-boluses along the mid-lateral thirds can restore natural convexity without making the center protrude excessively.
Speaking, smiling, and whistling show how the lips behave in motion. I often ask patients to say a few vowels during treatment. It looks funny, but it prevents overcorrection that only appears with animation. Modern lip filler techniques borrow from dental and facial analysis, treating lips as part of a perioral system that includes the chin, teeth show, and nasolabial support. Sometimes the most elegant lip improvement comes from a small amount of chin filler to balance projection, rather than more product in the lips themselves.
Natural versus bold: matching style to structure
Trending lip filler styles come and go, but anatomy governs what looks good. A natural lip filler approach emphasizes hydration, fine border definition, and a subtle increase in volume. A bolder style favors more pronounced vermilion show and a defined Cupid’s bow. The bridge between them is proportion. I often start patients with subtle lip filler, then offer a lip filler upgrade two to three months later if they want more. This staged approach reduces the risk of overshooting and gives time to live with the new shape.
Some specifically request “poutier” centers. That can be charming when the lower lip receives most of the emphasis and the upper lip’s projection stays restrained. Heavy upper-lip projection creates a beak effect on profile photos that almost no one likes. Precision lip filler favors restraint in the upper lip and strength where your natural tissue can carry it.
Cost, product selection, and longevity expectations
Cost depends on the region, injector experience, and the lip filler brands used. In many cities, a professionally performed lip injectable treatment ranges from affordable lip filler options to premium lip filler experiences in boutique settings. A single syringe is often enough for a first session. I prefer to use one product per session for consistency unless your plan specifically benefits from a layered approach. Longevity varies, but in most patients the result remains pleasing for six to nine months, with some seeing a full year. Those who love a crisp border may come in sooner for maintenance, as definition tends to soften before volume does. An annual lip filler boost suits many who want sustained lip rejuvenation without frequent visits.
Troubleshooting, corrections, and dissolving
Not every filler elsewhere is placed well, and earlier generation gels sometimes linger in ways that do not flatter the tissue. If you have migration above the vermilion border or heaviness that resists massage, lip filler dissolving can reset the canvas. It stings a bit, and swelling is expected for 24 hours, but the clarity it brings is worth it. After dissolving, I wait one to two weeks before a lip filler reshaping plan, longer if the tissue is irritated. Good dissolving is as artistic as injection, because the goal is to remove only what harms the shape while preserving any useful support.
For minor issues, a lip filler improvement session may involve micro-doses to lift a flat area or correct a corner droop. These small touches separate adequate work from excellent results. Patients often remark that the second session feels easier because the communication is already refined, and both of us share a mental picture of where the lip is headed.
Before and after that tell the truth
Lip filler before and after images can mislead when they are taken at different distances or under different lighting. In my practice, I standardize distance, angle, and expression. I include a full-face photo, not just a cropped mouth, to show how the lip enhancement procedure affects overall balance. The most telling view is the three-quarter angle, where projection, philtral length, and Cupid’s bow definition are obvious. When viewing galleries online, look for consistency and natural expression. Lush filters hide the details that matter.
The patient experience, in their words
I recall a patient, a classical singer, who feared loss of fine articulation. She wanted lip smoothing filler for vertical lines created by years of controlled breath and enunciation, but she could not risk stiffness. We used a very soft HA with microdroplet technique in the upper cutaneous lip, avoided the central vermilion entirely, and placed a whisper-thin thread along the border. Her result was invisible to the audience and visible to her only in how lipstick behaved on stage. Another patient, a long-distance runner, metabolized filler quickly. We managed expectations, planned twice-yearly lip filler maintenance, and prioritized shape over maximum volume. She stayed loyal because the plan fit her physiology instead of forcing a one-off promise.
A concise pre- and post-treatment checklist
- Plan timing: Avoid major events for at least a week after first-time lip injections. Prepare smart: Pause blood-thinning supplements with medical guidance, stay hydrated, and skip alcohol the night before. Know your goal: Bring a clear, realistic vision for shape, not just size. Expect swelling: The first 48 hours are not the final result, give lips two weeks to settle. Follow up: Schedule a two-week review for minor refinements or to set a staged plan.
Frequently asked, answered with nuance
Will it look natural? With conservative doses and the right gel, yes. Natural looking lip filler respects proportion and lip movement. If natural is your priority, say so, and your injector can bias technique accordingly.
Does it hurt? With topical anesthetic, integrated lidocaine, and a calm pace, discomfort is modest for most. A dental block is available for those who need it.
How long do results last? Six to twelve months is typical. High-mobility lips and fast metabolism can shorten this. Touch-ups keep results consistent.
What if I do not like it? Hyaluronic acid fillers can be dissolved. Part or all of the product can be reversed. Good documentation and honest communication make this process smoother.
Can I combine with other treatments? Yes. Perioral botulinum toxin for lip line moderation or a gentle lip flip, skin resurfacing for texture, and balanced chin or perioral filler can all elevate the result. Staging matters to minimize swelling overlap and to evaluate changes one at a time.
What separates careful from careless lip work
A measured injector asks more questions than they answer at first. They examine the bite, tooth show at rest, and the interplay between nose, lips, and chin. They choose a gel for each task, not a brand by default. They place the smallest effective dose and spend more time looking than injecting. They talk you out of chasing volume if your lip cannot carry it without distorting shape. They plan lip filler sculpting over sessions rather than stuffing more into a tight space. And they are prepared for the unlikely emergency in a way that you can see and feel.
A final word on expectations
Lips carry personality. A safe lip filler approach should heighten that personality instead of replacing it. If you share candidly what you like about your lips and what bothers you, and your injector listens, the plan will write itself. Lip cosmetic injections are not about achieving a pre-set template, they are about helping your lips function and express better: less cracking, more hydration, smoother lipstick, clearer borders, and a shape that harmonizes with your face from every angle. When the steps are followed with care, the outcome feels effortless, even though it is anything but accidental.
With that, the path is clear. Consultation anchors the vision. Preparation minimizes surprises. A meticulous lip injection procedure sculpts shape and function with small, exact moves. Aftercare supports healing. Review and possible refinement deliver the polish. That is how lip enhancement treatment becomes a quiet upgrade rather than a headline, and why it remains one of the most gratifying aesthetic treatments to perform and to receive.